Y’all know I love & adore LR. I thought I’d take you through my general workflow. First things first: I choose which catalog to which I will upload (I keep separate catalogs: one for each year for family stuff, one for each year for client stuff, one for florals, one for each year of my son’s school yearbook, etc.). So in this case I’ll be uploading yesterday’s family pics, thus I’ll choose Kellers 2010.
Then I’ll import my photos from my memory card. The following (pictured below) import box will automatically open. I’ll choose a file in which to place my original images. I’ll briefly glance through my thumbnails and discard any losers. I’ll back up to my z:drive (in case anything happens to my desktop computer). And I’ll add any keywords that I want automatically applied to these images.

Ok. Ignore that I screwed up my import and placed my misc. February images in my misc. January File. oops. I’ll rectify that later. Or not. :-}
Moving right along to the fun stuff: the Develop Panel. Here’s the important (and confusing) thing to understand about editing in LR. Your original files exist where you first imported them. They remain UNTOUCHED and SAFE and in their SOOC form despite all the experimenting and changing you do in LR. All of your editing in LR is like a transparency (a “tracing”, if you will) that you lay over your original photo. It’s that transparency that lives in LR. The SOOC photo + the transparency don’t “live together as one” UNTIL you export the new edited image. More on that later. Back to editing …
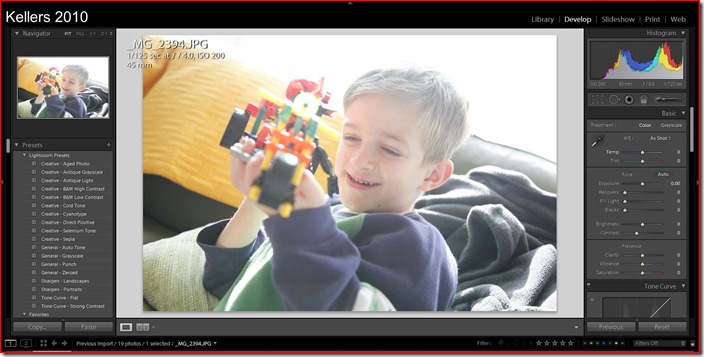 I usually first look at the overall color balance and adjust as necessary (I almost always add a little warmth – more yellow on the temperature slider). The next thing I look at is my histogram (chart at top right). I look for gaps on either end. If there is a gap on the right side, I increase exposure and/or brightness til the gap goes away. If there’s a gap on the left side (and there is in this case), I will increase my blacks til the gap goes away (this adds contrast and detail and color saturation). The next thing I do is hit “J” to have LR show me all the blown highlights (red) and lost shadow detail (blue). The below screen shot shows my increased blacks (to take away the histogram gap) and all my blown highlights – the red parts.
  As you can see I have lots of blown highlights. I will use the Recover slider to bring back detail on the couch and K’nex creation. I will not worry about the large red area in the window (nothing there to bring back). If I had lost shadow detail (would show as blue areas), I would use the Fill Light slider to recover those details. Now that the necessary corrections have happened, I’ll play with all the other sliders. I’ll usually bump clarity a bit (defogs the image), sometimes add a little vibrance (bumps saturation without messing with skintones so much), see how medium contrast looks on the tone curve, I’ll usually bump orange luminance (for portraits), add some sharpening, and maybe a little vignetting if I’m trying to draw focus to the center of the photo.
 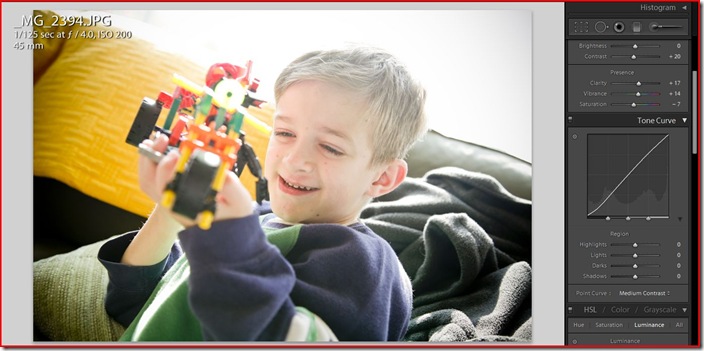 After I have a good clean color version, I’ll often try a bunch of fun different presets (see this recent post displaying my preset experimentation ). To create another edit I usually make a virtual copy (Ctrl-apostrophe). In this case I only wanted to create b/w version. (below shows SOOC, color edit, b/w edit). If I needed work that could only be accomplished to my satisfaction in Photoshop, it is at this point that I could hit Ctrl-E and LR would automatically send my image to PS for further work. Upon completion of PS edits, when I close the image, it would be sent back to my LR catalog as a new image with a unique name.
 So, at this point, I have my SOOC image (which, remember lives untouched in its original file) and two new transparencies of my edits. If I want to now use these new, improved images for anything (blog, print, etc.), I need to EXPORT them to create the final “merged” jpg. So I’ll highlight both my edits (from the Library mode grid) and hit Export (see button in the lower left area).
 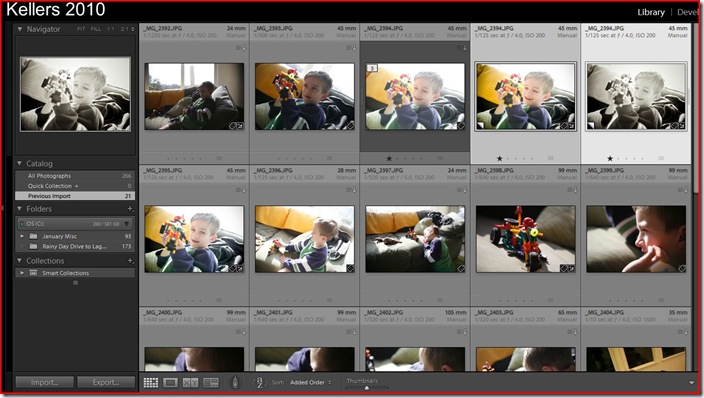 Clicking “Export” will bring up the export dialog box:
 At which point, I export the new merged images to (in this case) my blog folder. Typical blog settings for me are: Filename, jpg, sRGB, Quality 80%, resize to fit 700 px width, resolution 72 pixels per inch, sharpen for screen amount standard. (this, btw, can be saved as an export preset). Typical print settings would be: Filename, jpg, sRGB, Quality 80%, no resize, resolution 300 pixels per inch, sharpen for print glossy or matte. This may sound like a lot of steps, but the slider adjustments actually go quite fast, as does the export process once one gets the hang of it.
If you would like to experiment with LR yourself, you can download the demo version from Adobe free of cost.
And please ignore my funky spacing in this post. I'm playing around again with Windows Live Writer. And it throws me for a few loops.

 Ok. Ignore that I screwed up my import and placed my misc. February images in my misc. January File. oops. I’ll rectify that later. Or not. :-}


11 comments:
Susan,
Loved this and I know it will help a lot of LR's too!
I need to do the separate catalogs.
Thanks,
Beth
I'm going to download the trial version and get the hang of it while the weather is so cold here. This post really helped me see some of the advantages of Lightroom...I'll be refering back to it often. Thanks!
You know I am eternally grateful to you for the LR introduction, don't you? I'm reading a LR book right now that I am loving. Fun to see your workflow-- and see that it is similliar to mine. :)
Are you getting a cut from Adobe for your promotion yet? B/c you should! hope all is well with you all!
Nope, Sarah, no cut. I promo it because I love it and I think others will, too. :-)
And I'm so glad you've found it valuable!!
I've tried Windows Live Writer, but it was too frustrating. I still had to fix everything in html.
I finally uploaded the LR3 beta trial. I need to pay attention to these posts of yours and get "trialing".
Thanks for all the helpful info.-- especially on exporting. Never knew you could have an export preset.
I'm still not clear where LR fits in with Photoshop and why the two are used together?
Also, in your beautiful "studio", are you using a hot light or strobe?
Love seeing your fixes and reading through your blog. You are an inspiration!
Lisa -
LR is MORE than just a place to "develop" photos (but in terms of editing - it does it faster, more intuitively, allows you to easily slap your "fix" on any or all of the other photos with a single click, and allows you to scan over all the different presets, seeing a preview of what your image would look like IF you applied the preset). But it's also a photo library database, can create a slideshow, manage a website, or directly prepare your image to print... It is seamlessly linked to PS for when you need PS for more intricate editing.
About the "studio": no artificial lighting. :-) I haven't needed any. The light for my garage door studio (or really anywhere along the front side of my house) is darn near perfect all day. I just bump my iso depending how much light is available.
Very helpful, Susan. Thanks! We're thinking of actually installing the LR I bought in August, so this will come in handy!
You almost have me convinced I need to spend the money for LR. I am just so slow to add new things to my repetoire (sp?). However, I can't overlook the great success you have with LR...more pondering to come. Also, I love your studio. What a scenic garage door you have! :)
I love that it is free to try right now. I just don't have any more room on my computer to try it. I was hoping for a new one for Christmas but no such luck! Soon though! Thank you for this. I am printing it out for someday!
Post a Comment