Showing posts with label photo tips. Show all posts

June 17, 2016

Imitating Sam Abell Composition Techniques…with my phone camera!

I read an amusing article awhile ago about the stages every photographer goes through. One of the stages mentioned was studying the work of other great photographers (the ones who have stood the test of time) and building a photo book collection. I’m there. I’m collecting the books. I’m reading and being inspired by the books, by the photographers. I’m combing the internets and finding neato lectures by the amazing photographers. And then I’m blogging what I’m learning – most recently I’ve done this with the work of Sam Abell .

This morning, as my husband and I were enjoying the low-tide, wider-than-usual beach, I decided to experiment with creating an image explicitly inspired by Sam Abell’s style and the compositional choices he often makes to define his own imagery. I had only my phone with me, so this was strictly an exercise in composition and not in camera settings. To quickly summarize, Abell emphasizes the following: Composing from “the back” (the horizon, the environment, the geography), inhabiting “the front”, heads & shoulders belong above the horizon, and students quip that “nothing touches”. More description and links to Abell’s teaching can be found in this blog post referenced above.

So here are the results from my morning’s experiment …

1.  Compose from the back.  Find/create your environment/horizon.

1

2.  Anticipate what will happen (my husband will climb on a rock; he always climbs on a rock).

2

3.  “Inhabit the front”. (I’m thinking about rock/sand detail and how best to showcase that).

3

4.  Remember that ideally Sam Abell likes to place people above the horizon. He also likes low angles and “looking through surfaces”. (in the above picture, Big Dude is above the ocean line horizon, but not above the mountain horizon … I need to figure out which is my main background horizon. I also decide that I want my foreground to be stronger, more dramatic, more like “looking thru a surface”.)

4

5.  Lastly, I decide to use my strong foreground “look thru rock surface” to block out the homes on the left.

5

6.  In the end, I think I probably prefer the 4th image that includes the homes as leading lines.


April 11, 2016

National Parks - Photography Tutorial

If future generations are to remember us with gratitude rather than contempt, we must leave them something more than the miracles of technology. We must leave them a glimpse of the world as it was in the beginning, not just after we got through with it …once man can no longer walk with beauty or wonder at nature, his spirit will wither and his sustenance be wasted. Lyndon B. Johnson
My family and I have had the good fortune to walk with beauty and stand amazed in the midst of natural splendor in some of America’s National Parks.  As the National Park Service celebrates its 100th Anniversary, I wish to pass on some tips for enjoying and photographing nature in our parks.

1-yellowstone
 

12 Tips for Taking Photos in Our Amazing National Parks

Know the park policies.
At the risk of sounding “duh”, the very first thing you should know is the basic rules regarding photography in the parks.  This article from Backpacker breaks it down pretty simply.   And here are the rules direct from NPS:  Commercial Film & Photo Permits
Also at the risk of sounding “duh” … Know the rules of the park regarding everything else (ie dogs and where they’re allowed, don’t feed the wildlife, don’t pet the bison!, etc).  Check each park’s website for the lowdown.  Take the in-park caution signs seriously.


2-bison
3-fallin in zion

Most National Parks and Recreational Areas are HUGE - as in, too large to explore completely in a day. Know how much time you will have and prioritize which parts you want to visit. Check best time of day to visit each site. Even research best time of year to go (sometimes access roads are closed – like the Tioga Pass into Yosemite. Sometimes roads that are only open to shuttle buses in the summer are open to all cars in the winter like Zion Canyon Scenic Drive in Zion NP). Research the park’s website. Search sites like Flickr for images of potential destinations. Google reviews. Have a plan. You can always deviate, but it’s nice to have a starting point.

4- driving thru zion

National Parks are BIG EPIC LANDSCAPES. I think the best way to try to capture or mimic this epic-ness is to embrace wide angle and small aperture.  I’m usually shooting at a focal length between 15mm & 35mm. My aperture is often between f/8 & f/11.

5-glen cyn natl recreation area lake powell

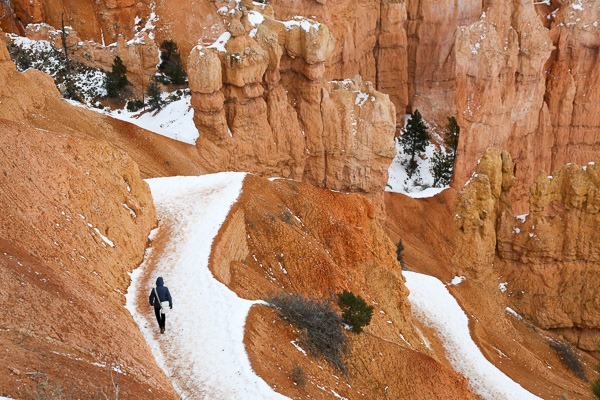
Neglect not to put people in your landscapes – they lend a sense of scope.
6-bryce solo hiker7-joshtree rocks8-bryce navajo loop

Rangers are a treasure trove of information. Don’t hesitate to ask them which is the not-to-be-missed hike, or where and when the wildlife hangs out, or how they would choose to spend their time if they were visiting. The rangers in Bryce Canyon didn’t hesitate to tell us that Navajo to Peekaboo was the ultimate way to explore.

9-peekaboo trail

Speaking of hiking … don’t overburden yourself with heavy gear. And, if summer, TAKE LOTS OF WATER. We Kellers are sadly infamous for underestimating water supplies.
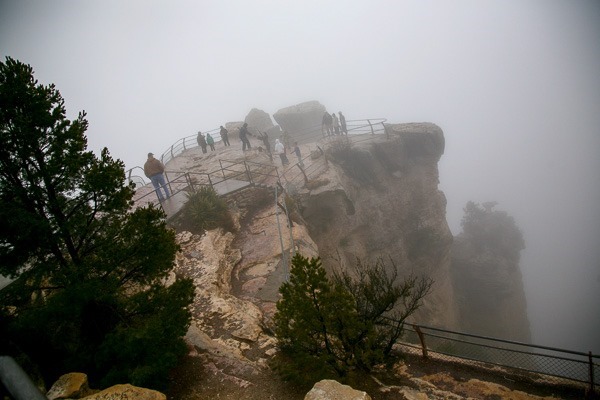
Expect the unexpected. Dispense with disappointment. Roll with it. The very first time we were taking our boys to experience the sheer grandeur of the appropriately named Grand Canyon, after a very loooong drive, we arrived to find this:
10-grand cyn fog11-my babies at the grand cyn12-grand cyn rainbow

Funny, yes? Ironic? Totally! But, as you can see, it certainly didn’t stop anyone from lining up to take pictures, as evidenced by the rainbow brigade of rainjacket-wearing photogs.
Don’t necessarily let weather deter you. Be prepared (proper clothing for hot or cold or wet or windy). Here’s the silver lining: Big weather usually equals really cool imagery. Dramatic clouds make me very happy.

13-weather

Consider taking the less traveled road … of course, do your research and know the risks. We took this unpaved service road from Bryce Canyon to Lake Powell. It wound through the National Monument Staircase Escalante. I totally want return here and explore more; such an epic landscape that was way more rewarding than the ordinary highway.

14-natl monument staircase escalante

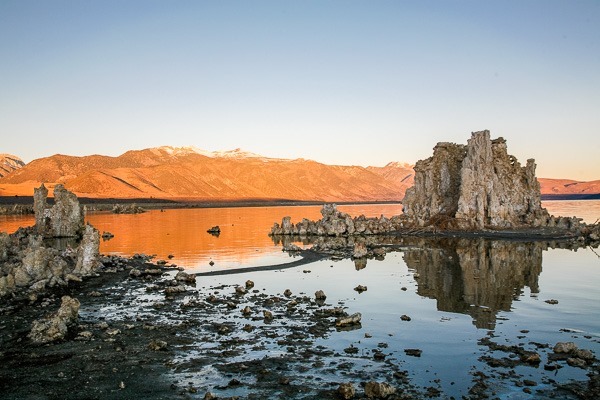
I know I’m speaking to the chorus here, and saying something that’s generally well-known, but, I’ll go ahead and beat the drum again: Yes, the lighting before/at and just-after sunrise is stunning!!!! (note: this is Mono Lake, not a National Park, but one of the few destinations where I pestered my kids to GET OUT OF BED and accompany me to sunrise.
15-mono lake 1

Of course, beautiful light also at Sunset!!! (note: way fewer people at sunrise). AND here’s a lesser known time that many people neglect: the 40 minutes after sunset sometimes provide a tremendous light and color show: http://shortonwords.blogspot.com/2011/11/simple-sunset-photo-tip.html (consider having your tripod handy for the slower shutter speeds)

16-mono lake after sunset

And speaking of Tripods ----do you take it or leave it? Honestly, on Keller roadtrips, we’ve already maxed out the car with people, Dog Dude, food & ice chest, and luggage. My tripod usually stays behind, unless I have a really compelling reason to bring it. I never bring mine on a hike (because I run out of steam pretty easily and my tripod is HEAVY). So, when do I consider bringing it? If I know I will need a slow shutter speed (for long exposure water shots, or low light – before sunrise or after sunset, or for night sky-star imagery), I bring it. In the Yosemite image below, there was a whole line of photographers with tripods to capture the moonrise. Since the moon was rising before the sun was set, I handheld. No problemo. The milky way over Joshua Tree, however, happened long after sunset and just after the moon dropped below the hill-horizon and thus required a 15 second shutter speed. Tripod all the way!

17-yosemite moonrise no tripod18-milky way in joshtree

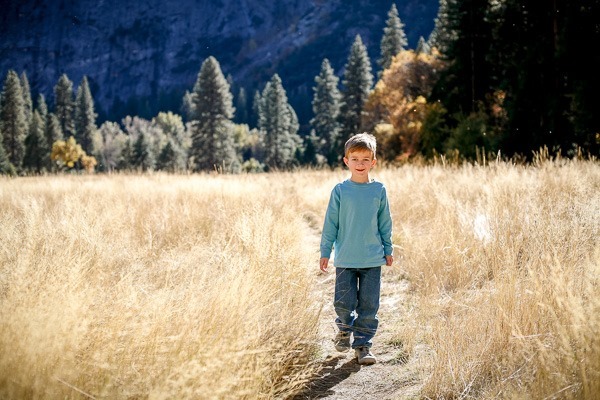
And lastly, if you see a golden field reflecting light all over everything, do not hesitate to throw your baby wearing oversized hand-me-down jeans from Big Bro out in that very same field to take his portrait. Because 6 years down the road when you rediscover the picture, your heart will melt and puddle all over the floor beneath you.
19-yosemite reflecting field


March 17, 2016

Lessons from the Masters: Sam Abell

This book + this fabulous 2 hour lecture = GOLD.  Insightful, interesting stories about the creation (creative process) of images.  Sam Abell tells a good story.  And debunks a good many myths.  And learning about his process inspires me to be more intentional about my own process.  


Some notes from his lecture ...

re: Train photo, taken at age 14. Submitted to canon contest. Wanted to win whole shebang.  Instead won $15 honorable mention prize in junior category.  Only printed – in his basement darkroom, which was only truly dark at nighttime – 3 copies.  Just sold last print. 

Shoots full-frame [digital now] only, full uncropped image, aims for sooc-uncropped, just as he did when shooting analog.  Inspired by, of course, Henri Cartier Bresson.   Likes to shoot with two bodies, 1 with a 28mm lens, 1 with 90mm = his walkaround “kit”.  Uses 90% of time.  Shoots without flash.  Sometimes with tripod, usually without.

[Now iconic] Train picture of his dad – Dad gave him his rolleicord camera, told him to compose the picture and wait.  Recommended low angle, leading lines.  His dad also told him “bad weather makes good pictures.”  :-D

His dad taught him how to photograph.  His mom taught him what to photograph.

Composing from “the back” (the horizon, the environment, the geography), inhabiting “the front”, heads & shoulders belong above the horizon.  Student in Abell’s class summarizing main point [humorously]:  “nothing touches”.   (the “articulation of space”)

3’, 4’, 5’ of height makes everything look better (being able to get above your scene/subject)

Macro composition (all that’s in your frame, edge to edge, the whole enchilada) vs. micro composition (the specific articulation of space, compose & wait, NOTHING TOUCHES – ha!)

One of Abell’s defining features … a strong horizon line.  (ie in his window/kremlin photo, dropping out the kremlin background by rising higher, thus catching cement sill of building=strong dividing horizon line, and finally ending with strong window frame line as horizon, and bringing waving-in-the-wind curtain back in.   took 12 hours to create final image)

OMGosh!!!  Sam Abell shoots Canon full-frame in “P” mode with +/- wheel.  Uses lcd on back to determine if he’s happy with image AS IS (no plans to photoshop).  He then laughs and says Canon doesn’t want him to tell people this.

Internal framing goal:  linking still life to landscape

Compose (the “macro” part:  looking edge to edge, whole setting, back to front, separation of layers,  internal framing?, looking thru surfaces?). Wait. (for a blue umbrella, a dog & Frisbee, a bison, wind on albino peacock feathers, a horse whinnying …).  Adjust (the “micro” part: a gesture, expression, lining everything up, and as one student summarized: NOTHING TOUCHES).   Shooting on “P”.  Not cropping.  Not using Photoshop.  Sam calls this a church of photography – one where very, very few people are in the pews, and he’s afraid to turn around and look lest he finds he’s the only one in the pews.

*****
Not from the book or lecture, but a recent shift in focus....
His epiphany, resulting in his current project:  http://distinctionhr.com/2014/02/sam-abell/

March 16, 2016

Composition Tips for Square Format Photography

 
intro-600px

Square aspect ratio in photography is not a new thing. Rollei created the first square format camera way back in 1929. Hasselblad, Holga, Polaroid, Kodak and others followed with their own versions of square format cameras. And yet, despite this established history, square format photography is relatively new to *me*. As an enthusiastic wide-angle, big-landscape photographer, I’m always naturally attempting to fit as much beauty as possible in every frame. Bigger, wider. Cropping? No way. Square format didn’t hit me over the head until 2012, when I fell in love with Instagram. And was “forced” to fill my grid with squares. Until I became enamored with squares. And decided that even if I could use a horizontal or vertical images, I would choose instead to be a “purist” and use ONLY squares.

So what have I discovered in two years? Square format is remarkably different than horizontal or vertical (portrait) format. It’s somehow simpler. It’s symmetrical. Your eye “reads” through it in a circular motion, as opposed to side-to-side (horizontal format) or up-and-down (vertical format).
I’ve had to learn a couple new tricks to create stronger square images. The very simplest trick, ironically and surprisingly, is the very hardest for me to embrace and incorporate: putting the subject right smack dab in the middle of the frame.

CENTER YOUR SUBJECT

center the subject-600px


SIMPLIFY WITH NEGATIVE SPACE
This trick is an old friend of mine, and it works just as well in squares as it does in other formats: simplify through using generous amounts of “negative space”, pushing your subject to corners and outer limits …

negative space-600px


FILL THE FRAME
Alternatively, simplify by filling the frame … Look to eliminate distractions.

fill the frame-600px


USE DIAGONAL LINES
Diagonals (implied or implicit) have serious impact in square images…


diagonal lines-600px


LEADING LINES
Leading Lines are pretty swell, too.

leading lines-600px


IT’S OK – and totally not boring - TO GO AHEAD AND CENTER YOUR HORIZON
it works nicely with the symmetry of the square. The square gives everything a perfect balance.

center the horizon-600px
 

STRAIGHT-UP SYMMETRY WORKS , too

symmetry-600px


SIMPLE GEOMETRIC PATTERNS or REPETITIONS ARE BEAUTIFUL IN SQUARES
For whatever reason, the strong shape of the square seems to complement and accentuate other shapes within it.

simple geometry-600px


REFLECTIONS, SILHOUETTES, SHADOWS
are, of course, fabulous in any format …

reflections etc-600px

I hope what I’ve learned in my pursuit of creating stronger square images can in some small way inspire you to create amazing squares!


February 2, 2016

Tips for Mastering Silhouettes


sil⋅hou⋅ette [sil-oo-et] –noun,
1. a two-dimensional representation of the outline of an object, as a cutout or configurational drawing, uniformly filled in with black, esp. a black-paper, miniature cutout of the outlines of a famous person's face.

2. a dark image outlined against a lighter background.


In photography, a silhouette is defined as an outlined shape that appears dark & without much discernible detail against a lighter/brighter background. This effect can be achieved with any kind of bright light source; of course, the most commonly used source is the sun, often around sunrise or sunset. The backlighting from the sun (or any bright background) shadows everything towards you. Your goal as the photographer is to expose correctly for the bright background, thus forcing everything else in the photo to be underexposed, producing, [tada!], the silhouette.

Ok, now that the requisite “technical” definition and detail is out of the way, let’s move on to our less esoteric list of helpful hints.
Firstly, let me assure you that this is easy. Really. Any child could do this. With any kind of camera. It’s truly as simple as pointing a fully automatic point and shoot camera straight at a bright sky and pressing the shutter. Truly. Cameras can practically do this with their eyes closed.
That said, here are some tangible technical tips...

1. You have to TURN OFF YOUR FLASH. This is imperative.
2. Try using a smaller aperture (larger number) to increase the depth of field - this means you’re more likely to have a sharper foreground and background in your shots. A smaller aperture might also reward you with a sunburst effect if the sun is your bright light source.

3. About metering (if you're shooting in manual mode): if you're using spot or center weighted metering, you need to meter for the SKY, NOT the subject. Full evaluative (or matrix) metering should work fine all by itself if your sky (or background) is big enough and bright enough.
4. Try placing your subject directly in front of the sun to cause a "glow" effect around your subject.

5. Be very intentional about placing as much of your subject as possible against the bright background. In other words, shoot from a low enough vantage point that your subjects are more fully placed against the bright backdrop.

sunburst glow

So those are the technical tips. To sum up super simply:
Find a bright light source.
Stick something in front of it.
Turn off your flash.
Press your shutter. 
Some More Random Tips:
6. Any given backlit picture can be either a silhouette or NOT a silhouette. The amount of light you allow in your lens determines the outcome.

either or

7. Don’t feel like every silhouette needs to be a “pure” silhouette. Don’t be afraid to let some shadow and highlight detail remain.

Annie

8. That said … you can also edit a not-quite silhouette into a stereotypical silhouette. You do this simply by darkening your shadow areas. Specifically, I play with the “shadow” and “black” sliders in Lightroom (usually pulling them both down). You can even make the effect more dramatic by desaturating to B&W.

cave-1cave-2cave-3

9. With a bright enough background, silhouettes can work in a variety of circumstances …
inside,

aquariumJefferson

outside,

pier
daytime,

trampolinetunnel
in the fog,

fog
in the bright sunshine …

shooting range

at sunset,

sand dunes
after sunset,

joshtree

10. Phone cameras LOVE to make silhouettes. In fact, if your sky (or any background) is big enough and bright enough, I promise your phone will default to silhouette.

phone pic collage

11. And an important reminder – ok, mostly a reminder to me – in the midst of all the big landscapes with wide sweeping skies and tiny people, neglect not the simple original traditional application of the silhouette:

profile