

sil⋅hou⋅ette [sil-oo-et] –noun,
1. a two-dimensional representation of the outline of an object, as a cutout or configurational drawing, uniformly filled in with black, esp. a black-paper, miniature cutout of the outlines of a famous person's face.
2. a dark image outlined against a lighter background.
In photography, a silhouette is defined as an outlined shape that appears dark & without much discernible detail against a lighter/brighter background. This effect can be achieved with any kind of bright light source; of course, the most commonly used source is the sun, often around sunrise or sunset. The backlighting from the sun (or any bright background) shadows everything towards you. Your goal as the photographer is to expose correctly for the bright background, thus forcing everything else in the photo to be underexposed, producing, [tada!], the silhouette.
Ok, now that the requisite “technical” detail is out of the way, let’s move on to our less esoteric list of helpful hints.

Firstly, let me assure you that this is Easy. Really. Any child could do this. With any kind of camera. It’s truly as simple as pointing a fully automatic point and shoot camera straight at a bright sky and pressing the shutter. Truly. Cameras can practically do this with their eyes closed.

That said, here are some tips...
1. You have to TURN OFF YOUR FLASH. This is imperative.
2. Try using a smaller aperture (larger number) to increase the depth of field - this means you’re more likely to have a sharper foreground and background in your shots. A smaller aperture might also reward you with a sunburst effect if the sun is your bright light source.
3. About metering (if you're shooting in manual mode): if you're using spot or center weighted metering, you need to meter for the SKY, NOT the subject. Full evaluative metering should work fine all by itself.
4. Try placing your subject directly in front of the sun to cause a "glow" effect around your subject.
5. Be very intentional about placing as much of your subject as possible against the bright background. I'll show an example below of a picture I took that could have been much improved had I placed my son more fully against the sky, above the horizon.
Notice the difference between these two. I failed to get my youngest son fully against the light. But my oldest son is clearly profiled against the sky.
 |  |
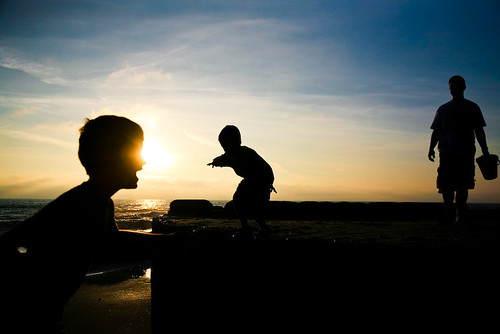
Here's a picture that could have been a much stronger silhouette if I had changed my perspective, shot from closer to the ground, thus placing my men above the horizon:

Here's my attempt to place the sun slightly behind my son to get that lovely glow-y effect. If I had used a smaller aperture, I might have gotten a sunburst appearance.

So that's about it. My long-winded account (ironic, since I usually use words sparsely) of how to take a really quite simple picture. To sum up:
1. Find a bright light source.
2. Stick something in front of it.
3. Turn off your flash.
4. Press your shutter.
5. And, of course, be sure to share your favorite one with us all during Silhouette Week!

For more silhouette samples, feel free to drop by my Silhouette Sequel post on my blog. I promise I use almost no words. ;-)
Susan Keller Photography

5 comments:
I think you are BFF's now! It surely means an invite to the ranch, right?!
You better take me as your "second-in-command." ;)
you rock! :-) thanks for doing this - I was just sitting her looking at the themes and thinking about how i just dont know how to take silhouette pictures! :-)
Awesome, Susan!!!
Always learning something fantastic when I come here!
If Angie is second in command, then I will be the assistant. :D
Great post!! I'm absolutely in love with all things silhouette, but, lo and behold, have NOTHING here that's sil'd of my children's faces. Nada. Great techniques and a wonderful blog. :o)
Happy weekend!
Post a Comment